You didn't ask for it. You probably never thought to want it. But here it is regardless; How to build a Blickensderfer typewriter, or more specifically a Rem-Blick.
Before I begin, I would like to state the following: The Blickensderfer is the smallest, most ingenious bundle of typewriter engineering I have seen to date. Its design is simple, yet complex. Elegant, yet robust. And I am ever so glad to have had the chance to delve into one.
---------How does a Blickensderfer work?---------
What sort of black magic is involved in making a blickensderfer work, you wonder? Turns out, none. Shocking, I know.
The Blickensderfer works on a basic gearing principle. By pressing a key, a partial gear is moved on the body, which acts upon a similar partial gear on the typewheel mechanism which turns the typewheel itself. Each keylever has a small, specific-length extension which, upon being pressed, moves the gearing lever by a certain amount before then moving the universal bar. Due to the symetrical design, when both left and right gears attempt to move, the typewheel does not rotate. This allows, due to the previously mentioned difference between the gearing lever and the universal bar, the selection of letter or symbol. The depressed keylever swings the typewheel to the spot it requires as it then hits the universal bar, stopping any further turning of the typewheel. The depression of the universal bar moves another gearing set which swings the typewheel downward, where it impacts the inking roller and then the paper.
Movement of the carriage is far simpler. There is a main action piece which, upon its forwards and backwards movement, allows teethed levers to swing slightly, which grab the carriage teeth and push it forward a spot.
And so here we begin:
When taking 3 bank typewriters apart, there always seems to be the rule of 3; each machine has 3 distinct, separate main parts which make it up. For the Blick, the 3 are the main body, the typewheel body, and the carriage. This first part details the main body of the machine.
Here we begin with the main body plate.
Please note that I did not take the main action levers out of the machine due to the screws responsible for allowing that having their screw slots snapped off entirely. 90 year old metal always has the chance of being too soft to safely work.

First, we add the shifting keys. From left to right, the sequence is washer, figure key, capital key, slotted-end of screw.

Once added to the machine, they should sit happily on their stubs.

Now we add the front guide plate, which also has the shifting action lever on it.

With the plate on (allow it to be slightly loose up until the end of this entire post), we now move to some small additional details.

This spring connects to the 3rd operational segment of the shifting sequence, and the small roller goes just below the guide plate in the center of the machine


Next we add the shifting lock/stop. Before this is in place, dont expect your shifting keys to operate correctly with the action lever.

Now that thats installed, and the spring having been placed, the shifting keys should be resting at their natural state.

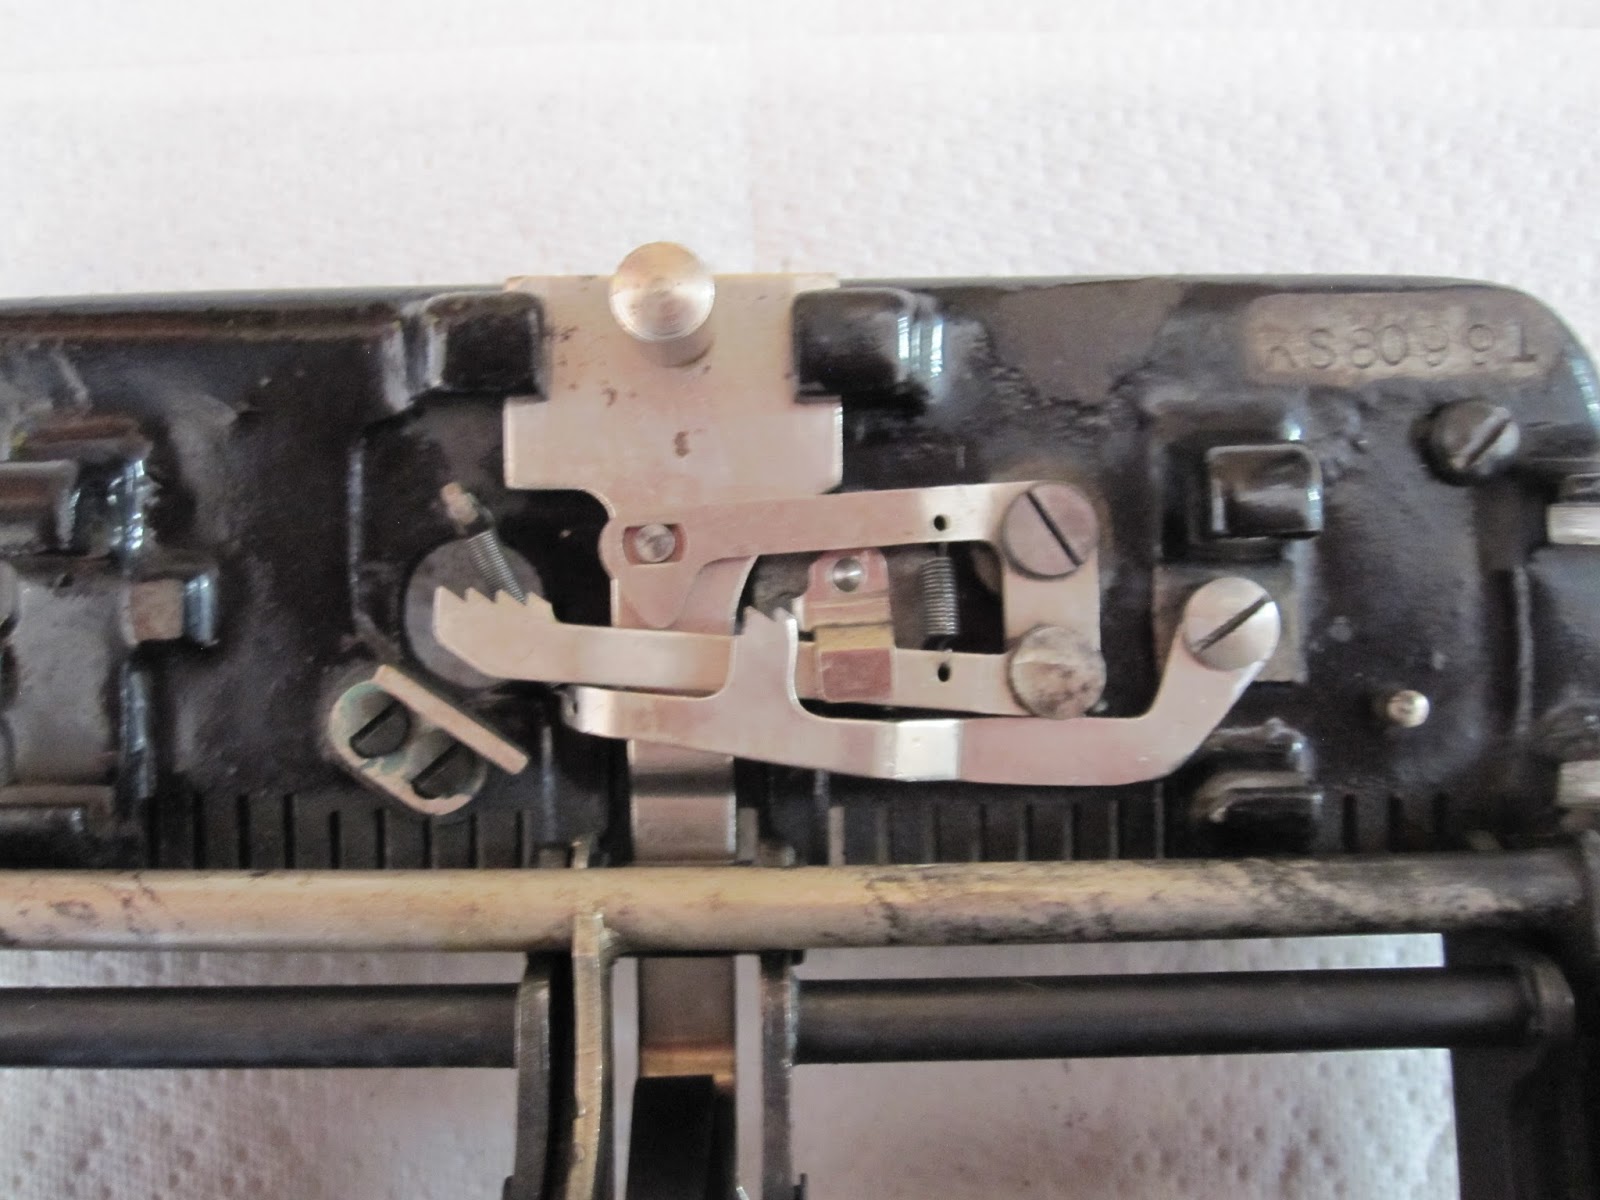
Here is the main action piece of the entire machine, which drives the movement of the carriage upon a keystroke. The small screw is what the main spring attaches to.

To get the piece in place, you will have to carefully, but with strength, push the smaller end up into its correct position above the roller while getting the back end into its slots.

Then attach the screw to the underside.

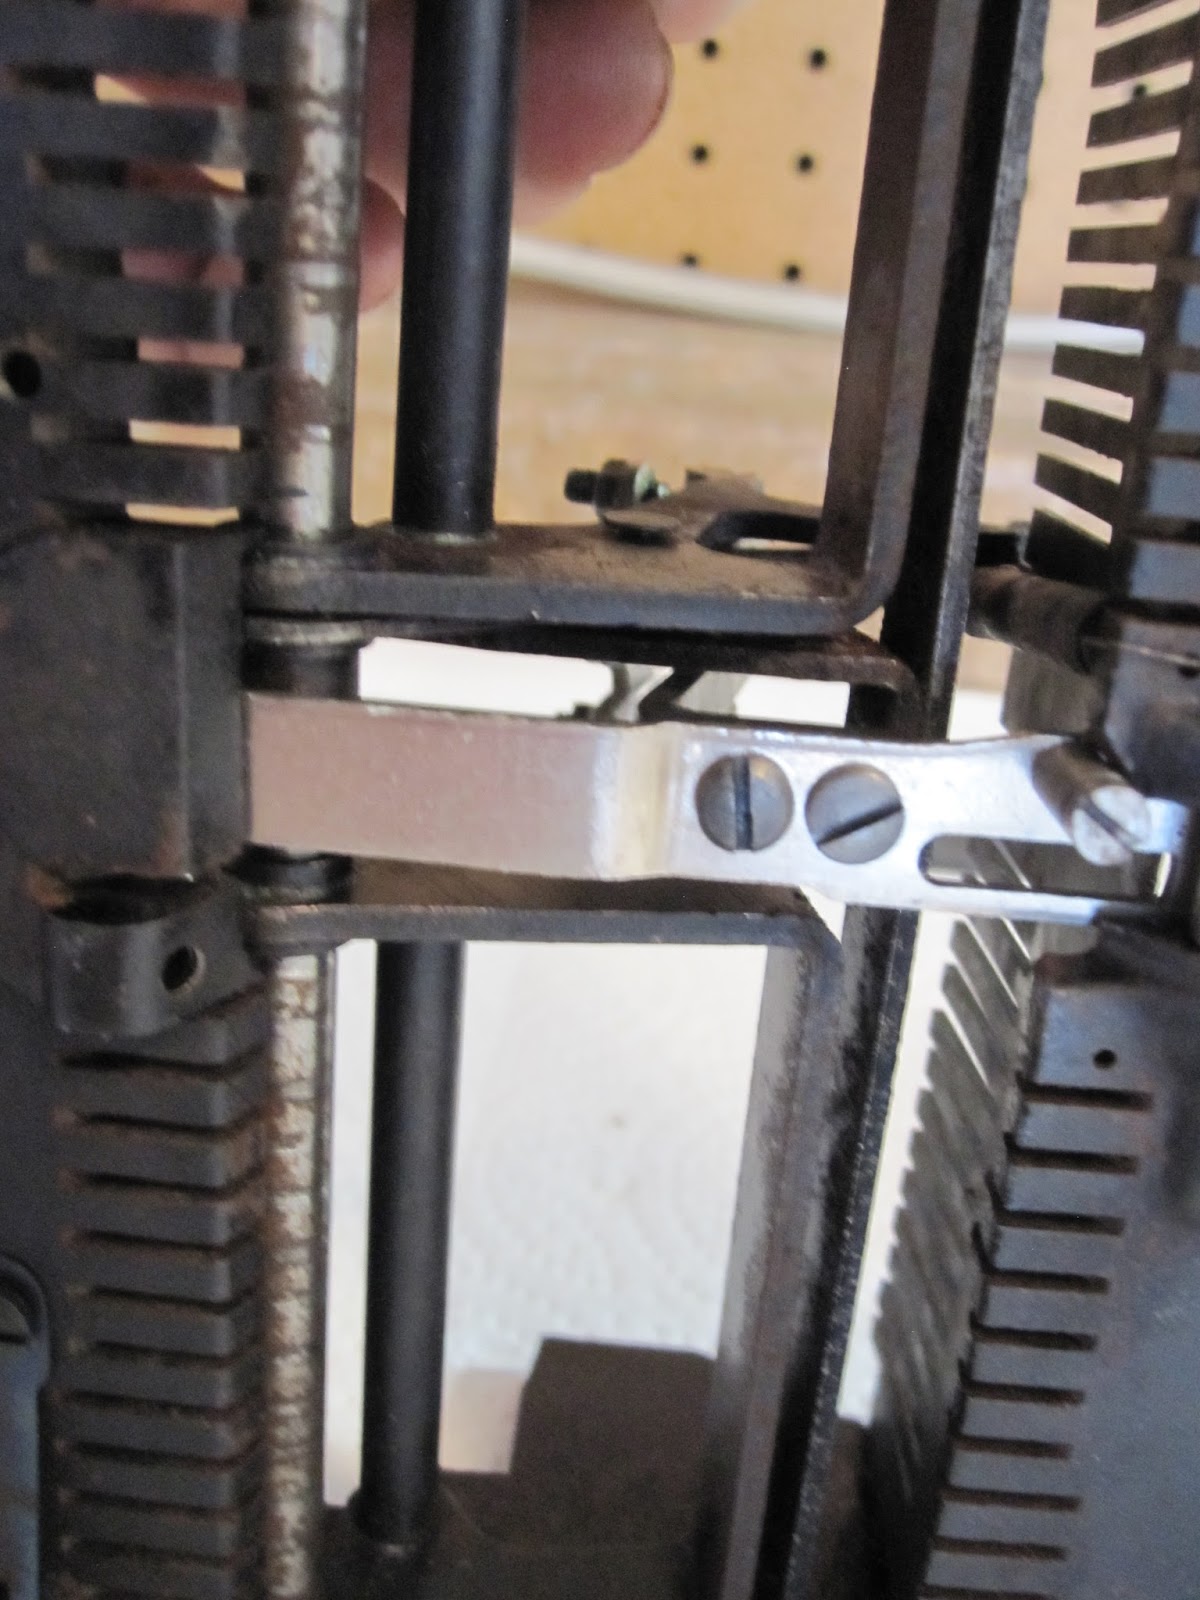
Now we add this long piece which is what connects the main silver piece to the action of a keystroke.

This is a horrid picture, but you can see the piece to the left of the center vertical line.

Where it connects on the bottom;
Next up are the bits which actual move the carriage at the keystroke.

The small bit, which screws in from the bottom, is a stop for the main movement and also is used to guide the next piece.

Please note that the piece towards the bottom has a spring which attaches to the body of the machine just above the teeth of the other piece.
Next we add the other keylever comb, towards the back of the machine.

Woops, forgot to show where it goes. It screws in just behind the main side juts from the cast frame.
Now we can add the keylevers. I clean them 3 at a time, then add them to the machine so that I don't go insane from doing all 28 in a single sitting.
To place them in the machine, simply slot them in through the guides and push up on the hooked back so that it clasps onto the large rod which, as stated, I did not pull out of the machine.

Tada!

Now we add the keylever plate which keeps the levers from coming out again.

Make note that the cutout curve opens down and not up, to accommodate the main spring. After putting this plate on, I went ahead and put all the keylever springs back in place. They hook onto the keylever itself with a half loop, and stick between the front guide plate and the frame with a small zig-zag, and hold in place.

Next we add the main spring, and its adjustable holder.

Quick and easy, the main driving force of this machine is in place.

Next is the bottom plate, to protect the innards of the machine.

You now have a completed body of a Blickensderfer!

Next up; the typewheel body.
Really impressive. I love how you fearlessly tear these old machines apart and put them back together. You've inspired me to re-visit my Oliver. I'd like to break it down to clean it properly, but I have had problems just getting past the old rusty/corroded screws, nuts and bolts. I worry about about stripping the heads. What products/tools/techniques do you use to get those old screws/nuts/bolts off without damaging them?
ReplyDeleteYou will want to consider if you are willing to live with the consequences of delving too deeply into these machines, first. I have a more willing attitude towards dismantling these machines due to my nature, and a very deep hatred of dirt and grime. I have incidentally broken pieces of machines when I have taken them apart. Sometimes, rust has so overtaken a screw that simply turning the slothead breaks the said head off. Sometimes the metal has softened in its extreme age, and barely applying pressure cracks it or snaps half the head off. And though there are certain techniques I have learned to use to avoid these problems as much as possible, it sometimes still happens, and sometimes to completely irreplaceable parts. My Fox 25 lacks a backspacer due to my actions, I am afraid to say, due to a screw which broke in half. So, now that I have said that;
DeleteTaking machines apart is usually pretty easy but, as you have found, rust can quickly inhibit that. Rusted screws can be tackled with a product along the lines of Liquid Wrench, and once you've allowed the stuff to do its work, place the screwdriver head into the screw slot, gently tap the back of the screwdriver with a small block or what-have-you (gently cannot be overstated), and then when turning the screwdriver do it very slowly, but with pressure. If you ever feel as if the screw is turning, but it just feels way too sluggish and odd in doing so, stop and think about if you need that screw out. The odd feeling might be the twisting of the metal itself, and it may be near snapping.
Make sure that you are using a "gunsmithing" (not sure what other name they go by) screwdriver set, which can be picked up cheaply at your local hardware store. They are usually a single screwdriver handle, and multiple heads. The heads have a rectangular tapered end so that they fit wholly into the screw slot, and are an immense help.
Save for that, you just have to hope for the best. The outstanding part about typewriters is that, being machines, if you happen to break something you can more than likely fix it. A stripped screw can be fixed in most cases by drilling it out, using a tap to make the new hole threads, and selecting a new screw to fit the new holing.
I would like to mention that many other individuals have very efficient ways to clean their machines without taking them too far apart, if at all. You may want to ask Mr. Richard Polt for advice, as he does exceptional work.
There is also this individuals blog which had a few posts about how he deep cleaned his own Oliver 5: http://dwabrenaissance.blogspot.com/2014/06/my-first-oliver-no-5-clean-up-method.html
Thank you for these tips - and words of caution. I am going to give the Oliver carriage another try with a little help from Liquid Wrench and see if I can get the screws out without breaking anything.
ReplyDeleteQuestion that you seem to be the best person to ask of, since you so bravely got down to the basic parts of a Blickensderfer--my Blick sometimes adds a spacing between typed letter. If I do typing on any letter, say "y," a raw of yyyyyyyy, then it would look like I pressed a space bar a couple of time in between: y yyy yy yyy. But I didn't press the typebar and I wonder, what makes it jump? Hope you have a suggestion. Thank you!
ReplyDeleteAlex
That is actually a very interesting question. On any other typewriter, which use spring-motors to pull the carriage along, the answer would most likely be a broken tooth on the escapement. But the Blickensderfer, in its operation, pushes the carriage along physically at the keypress. That said, all I can suggest is speculative since that issue occurring seems improbable. The first thing that comes to mind is that perhaps the long "7" piece is bent slightly, and a keystroke may on chance allow the carriage movement push just slightly too far. The second thing I would ask of you is to check that the type-wheel fully depresses down upon the platen each time the Y is pressed. As said, I cant imagine the carriage jumping forward a character due to the nature of the machine, but it may be possible that sometimes the typehead might be getting caught just before its able to print, but after tripping the escapement function. If neither of those help, I will do further study and make recommendations. What model of Blickensderfer are you dealing with by chance?
DeleteThank you for the suggestions! I am dealing with a No. 7. I think I will try to snap a short video of it, may be it would help to explore the problem
DeleteAlex
Does it create the interval at the exact same space on a different row, or does it seem random? The only other possible issues I could think of without further explanation would be that the ink-roller arm isnt returning to its proper position every keystroke due to friction at its joint, or simply the ink roller itself is dry on parts of it, and therefore cant ink the type as it hits
DeleteI posted a sample of its typing here: https://flic.kr/p/xuugcm
DeleteIt is almost always guaranteed to make a space after the 1st symbol in the line.
After that, it either goes relatively well, or sometimes condenses two symbols together (showing ggg row)
I made a short video too, but I don't yet how to post it, probably by dropbox or google drive
Dry or bad/old ink roll is a thing to address too (I don't know if it is relevant to the problem, but there is an issue with it)
ReplyDeleteI bought a brand-new replacement roll and I also bought the ink. But .. I am yet to figure out how to take the old roll off :) It appears to be kept by a metal fork on both ends of its axis, there is no apparent hint for any lock. I downloaded a manual too, but haven't found a way yet.
On the inking part ... I am pretty much obligated to ink it each time I use it, I wonder if this is by design or my current roll is just too old/flat and dries out too soon. I mean, its a minor problem since I have a huge bottle of ink, but is an inconvenience, making me think that it was not probably going this way in the new machines
To take the old inking roll off, you should be able to lift the left side of the pronged part directly to the side of the ink roll itself. It may be rusted in place, however (mine was), and refuse to budge. You'll have to gently ease it, while oiling it a bit, to get it to open again if so. I'm afraid that I have no idea what to suggest after seeing the type-sample. Its hard to tell if its a random occurrence or a guaranteed occurrence, and therefore hard to troubleshoot. The model 7 may be slightly different from the model 5 in regards to its basic action as well, as I have not had the fortune to dissect a model 7. I wish you the utmost luck in solving the issue!
DeleteThank you! The issue with changing the inking roll got resolved (it is stiff, yes), and in the No.7 model it turned out to be on the right-hand side (the moving "hook" slide). By mere luck, it moved a bit while I was playing with it, and then I was able to convince it to move all the way.
DeleteOn the typing skipping and congesting, I will soon have a chance to observe it on another Blick, and then compare the two side by side, how they move, it will hopefully provide the hint
Do you know where I can buy the space bar for a 1909 blickensderber No 5
ReplyDeleteI was lucky enough to find a Blick 7 this afternoon. I was told it's at in its box for 80 years without ever being opened. But it is showing wear and needs a good cleaning. My problem now is the carriage does not move left or right. Everything else seems to be working. Any advice on how to get the carriage functional again?
ReplyDeleteA lot of people contain the high-class involving having the capacity to find the money for a new ATV. Certainly not we all contain the income as well as your credit history for you to make use of in a real invest in. Should you be taking into consideration getting a applied ATV, there are several issues you have to be confident to view. Perhaps whether it is applied, anyone even now desire to make certain you happen to be getting a safe jogging ATV. https://pressurewasherguides.com/how-to-clean-atv-plastic/
ReplyDelete